Tuesday, July 12, 2016

The Internet is Not Really Free


Lot of resources on the internet seems free. We are using it free of charge. There should be a way to the content providers to earn money. This is where the digital footprint information is used for the business purposes. Though the online services seems free, those are not actually free of charge.
Tracking the user information, customizing the content and using the analyzed data becoming a growing business in internet. There are specialized people in this area, they observe and collect the data and link with other sources. Mainly marketers and advertiser use this technique to promote their product.
There is no direct cost involve on the internet to watch a video, read a blog, view a web site, etc. Though the users are not paying directly, they are paying indirectly. As described above the content providers need money to maintain their services, to their servers, their database storages and network facilities. The content providers earn money indirectly to run their services.
The question is how the content providers can earn money indirectly from the users. The service is funded by monetizing information about the internet user, about his preferences, his interests and his social circle, basically the information collected in the form of digital footprint. If the user pay a subscription or not, these information will be collected and used for various purposes.
The users may notice that when they visiting a web page there are so many advertisement all over the pages. Most of the advertisements are matching with the users’ preferences. How the content provider predict the correct advertisement is from the collected digital footprint information. For example a user searching for a shirt in an online store and he is interested on it. This data will be stored, next time the user log in to a web page he will notice the shirt advertisements are popping up at the page.
To select the right advertisement on the page, the marketers and the advertisers may choose based on the demography, language, right product, the correct time and other factors; that will help to target the consumers effectively.

Some intermediate parties playing a role between the user and the advertisement companies. The intermediate parties collect user information such as user profile, preferences, language and single sign-on data, and they analyze and process the information and provide to advertisement companies. There may be no direct connection between the user and the advertisement parties, the connection resides through intermediate parties.

Monday, March 7, 2016

Add list of users to SharePoint group using powershell


After migrating SharePoint 2010 site to SharePoint 2013 the user permission is not working as in 2010. The users are getting access denied message. This is due to SharePoint 2013 use the claim based authentication mechanism. As a quick fix I wrote a power shell script to add users to a SharePoint group.

Store the users in a text file as bellow format:
i:0#.w|domain\username

Use the bellow script to add permission:


 $loc = Get-Location;  
 $Users = Get-Content "$loc\Users\Users.txt";      
 foreach ($User in $Users) {       
 write-host($User);  
 Set-SPUser -Identity $User -Web "http://shpapp:2000/sites/TaskApproval/" -Group " Task Confirmation Users";       
 }  

Friday, March 4, 2016

Site collection feature not visible when upgrade solution from SP 2010 to SP 2013


I migrated a SharePoint 2010 site to SharePoint 2013 farm. And crated a custom web part and deployed to the 2013 environment as usual PowerShell commands.

The commands as follows:


After deploying the wsp to a web application the feature was not visible in the site collection features page.

The issue is due to the migrated site is comes with the 2010 user experience. Once the wsp is deployed using the above command the feature goes to 15 hive which cannot be display in a 2010 user experience site.

Resolution
I have tried below 2 options both worked: 
  1. Change the user experience to SP 2013 UI by following 'Start now' link at the top of the site.


After changing the user experience you can see the feature in the site collection features page.
If the user does not like to change the UI layout this option is not going to work out.

2. You can follow bellow commands to deploy the wsp:

This command is adding the feature to the 14 hive features directory, this will be displaying in the site collection features page.


Thursday, February 18, 2016

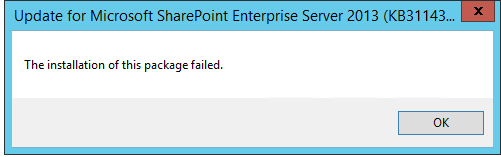
The installation of this package failed.


When I try to install CU update for the SharePoint 2013 server, it gave bellow error:


Resolution:

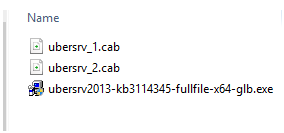
This is due to missing of some cab files. For the complete installation the bellow files should be there: 


Wednesday, February 17, 2016

Change url of document library - SharePoint 2013

After creating the document library in SharePoint 2013, sometimes you might need to change the url of the library. You can follow bellow steps in the browser:
  • Open the document library
  • Go to library settings from Library tab at the ribbon
  • Click 'List, name, description and navigation' link.
Using above steps you can change only the library name, but the url will not change.

Using the browser there is no way to change the url. You can do this using SharePoint Designer. Follow the bellow steps:
  • Open the SP designer and click on the 'All Files' not the 'List and Libraries'
  • Right click on the library and select 'Rename'

This will change the library name as well as the url.

Tuesday, January 6, 2015

Consume JSON web service by posting JSON to the server as input

Following code describes how we can consume a JSON web service by passing inputs as in JSON formats.

public static void GetJson()
        {
            var httpWebRequest = (HttpWebRequest)WebRequest.Create("<>");
            httpWebRequest.ContentType = "application/json";

            httpWebRequest.Method = "POST";
            httpWebRequest.Accept = "application/json";
           
            IWebProxy proxy = httpWebRequest.Proxy;
            if (proxy != null)
            {
                string proxyuri = proxy.GetProxy(httpWebRequest.RequestUri).ToString();
                httpWebRequest.UseDefaultCredentials = true;
                httpWebRequest.Proxy = new WebProxy(proxyuri, false);
                httpWebRequest.Proxy.Credentials = System.Net.CredentialCache.DefaultCredentials;
            }

            using (var streamWriter = new StreamWriter(httpWebRequest.GetRequestStream()))
            {
  //Sample JSON input
                string json = "{\"filter\":\"CREATED_DATE\",\"customerList\": [5478, 25414],\"fromDate\":\"2014-08-13\",\"toDate\":\"2014-09-11\",\"status\":\"transit\"}";

                streamWriter.Write(json);
                streamWriter.Flush();
                streamWriter.Close();

                var httpResponse = (HttpWebResponse)httpWebRequest.GetResponse();

                using (var streamReader = new StreamReader(httpResponse.GetResponseStream()))
                {
                    var result = streamReader.ReadToEnd();
                    Console.WriteLine(result);
                }
            }
            Console.ReadLine();
        }


The Sample JSON input added at the above code is passed to the server and the result is queried based in the provided input.

Tuesday, June 3, 2014

Authenticating Users via Facebook in ASP.NET MVC 4

This section shows you how to build an ASP.NET MVC 4 application that enable users to log in with external providers like Facebook. The same way you can authenticate users using Google, Twitter, etc…
The following describes the steps to follow.

In Visual Studio, create a new ASP.NET MVC 4 web application and name it as ‘FB’. Select the target framework as 4.5 or 4.

Select ‘Internet Application’ as the project template.
In the selected project template, the project is created with a file named AuthConfig.cs in the App_Start folder. This file contains code to register for external authentication providers. By default, the code segment is commented.


Since we are going to authenticate users using Facebook, uncomment the section that represent Facebook authentication.

public static class AuthConfig
    {
        public static void RegisterAuth()
        {
            // To let users of this site log in using their accounts from other sites such as Microsoft, Facebook, and Twitter,
            // you must update this site. For more information visit http://go.microsoft.com/fwlink/?LinkID=252166

            //OAuthWebSecurity.RegisterMicrosoftClient(
            //    clientId: "",
            //    clientSecret: "");

            //OAuthWebSecurity.RegisterTwitterClient(
            //    consumerKey: "",
            //    consumerSecret: "");

            OAuthWebSecurity.RegisterFacebookClient(
                appId: "",
                appSecret: "");

            //OAuthWebSecurity.RegisterGoogleClient();
        }
    }

The above code required for two parameters; appId and appSecret. If you try to run the application now, the application will throw exception. You need to give valid parameters, to provide the values, you must register your web site with Facebook.

Registering the web site with Facebook

You must register with the provider to get the required parameters. Visit Faceebook Developer page and click ‘Create a New App’ link under Apps to create a test app.


Give Display Name, Namespace and click ‘Create App’ button.
Go to settings tab of the created App, you will find the App ID and the App Secret.


While registering you need to provide MVC application hosting URL to Facebook App (in my case localhost). You can give the URL by clicking ‘Add Platform’ link.

As the final step add the appId and appSecret to AuthConfig class and you have done. Run your application and click in Log in button.

The template automatically includes the button to log with Facebook.


You can click on the Facebook button, which will redirect to Facebook login page.


Once you log in using Facebook credentials, you can see the home page of the MVC application with the Facebook user.