Friday, July 28, 2017
Date Dimension Generator
Following SQL query is to create simple date dimension table and then insert values to the given range.
Create table
CREATE TABLE [dbo].[DimDate](
[Date] [date] NOT NULL,
[Day] [varchar](10) NULL,
[Month] [varchar](10) NULL,
[Year] [int] NULL
) ON [PRIMARY]
GO
Script to generate date
DECLARE @startDate date;
DECLARE @endDate date;
SET @startDate = '2017-01-01';
SET @endDate = '2018-12-31';
WHILE(@startDate <= @endDate)
BEGIN
INSERT dbo.DimDate
SELECT
CONVERT(Datetime, @startDate, 120) [Date],
DATENAME(DW,@startDate) [Day],
DATENAME(MM,@startDate) [Month],
DATEPART(YY,@startDate) [Year]
SET @startDate = DATEADD(DD, 1, @startDate )
END

Dimensional modeling
After working with .NET and SharePoint technologies for long
time, I started to look in BI Analytics area. This article is to give an overview
of data warehouse, dimensional modeling, and fact constellation. First of all
we will see what is data warehouse and data mart.
Data warehouse and
data mart
Data mart is a subset of data ware house where it represents
a specific business scope. Multiple data marts together create a data
warehouse. In a typical organization, there are multiple departments focusing
different business objectives such as IT, administration, finance,
manufacturing, HR, etc. each department data can be considered as data marts
and altogether it will come under a data ware house.

Data marts often holds only one subject are as explained in
the above figure. Also it may holds more summarized data. Data mart focused on
a dimensional model using star schema. Whereas data warehouse holds multiple
subject areas in very detailed manner. It works to integrate all data sources. Data
warehouse does not necessarily use a dimensional model but feeds dimensional models.
Start schema and snow
flake
Start schema and snowflake are two different ways to
organize data marts and data warehouse using relational database. Both methods
use dimension tables to describe aggregate data in fact tables.
Star schema has single fact table connected to multiple
dimension tables and it visualize as star. In this model only one link
establishes the relationship between the fact table and any of the dimension
tables. Following figure explains the design of the star schema.

Snowflake schema can be seen as the extension of star
schema. Here large dimension tables are normalized into multiple sub dimension
tables. Every dimension table in this model is associated with sub dimension
table and multiple links. Following figure explains the design of the snowflake
schema.

Friday, July 29, 2016
The query cannot be run for the following DataObject: Get User Profile By Name: SharePoint 2013
I was developing a heavy
InfoPath application with custom codes. The form contains around 40 data
connection including external data connections, web services, etc… This form is
using ‘Get User Profile By Name’ data connection which come along with the UserProfileService.asmx
web services. The user profile web service url comes as follows: http://shpapp:2000/sites/Test/_vti_bin/UserProfileService.asmx
When I try to open the
form in the preview mode it pops up below error message:

Error message:
The query cannot be run for the
following DataObject: Get User Profile By Name
InfoPath cannot run the specified
query.
The SOAP response indicates that an
error occurred: A user with the account name MohamedAkb could not be found.
---> An error was encountered while retrieving the user profile.
I started search, almost all the suggestions say set the form in to full trust mode as bellow:
- Go to File - > Form Options -> Security and Trust
- Select Full Trust option button.

The above option is use full
to deploy the form at the farm level. If the form contains VSTA code, it is
must to deploy as full trust mode. This doesn’t help to resolve the user
profile issue.
To resolve the user
profile issue follow below steps:
- At the create data connection wizard untick the ‘Automatically retrieve data when form is opened’ option.

- At the form load event create a rule to query the data connection. In the rule, set the query field as Account name = DOMAIN\UserName then query the data connection.

- Save the form and open in the preview mode. You will see no errors now.
Thursday, July 21, 2016
Change URL of a Document Library - SharePoint 2013
After creating the document library in
SharePoint 2013, sometimes you might need to change the URL of the library. You
can follow below steps in the browser:
•
Open the document library
•
Go to library settings from Library tab at the ribbon
•
Click 'List, name, description and navigation' link.
Using above steps you can change only the
library name, but the URL will not change.
Resolution
Using the browser there is no way to change
the URL. You can do this using SharePoint Designer 2013. The steps as follows:
•
Open the SP designer and click on the 'All Files' not the 'List and Libraries'
•
Right click on the library and select 'Rename'
This will change the library name as well
as the URL.
Tuesday, July 12, 2016
The Internet is Not Really Free
Lot of resources on the internet seems free. We are using it free
of charge. There should be a way to the content providers to earn money. This
is where the digital footprint information is used for the business purposes.
Though the online services seems free, those are not actually free of charge.
Tracking the user information, customizing the content and using the
analyzed data becoming a growing business in internet. There are specialized
people in this area, they observe and collect the data and link with other
sources. Mainly marketers and advertiser use this technique to promote their
product.
There is no direct cost involve on the internet to watch a video,
read a blog, view a web site, etc. Though the users are not paying directly,
they are paying indirectly. As described above the content providers need money
to maintain their services, to their servers, their database storages and
network facilities. The content providers earn money indirectly to run their
services.
The question is how the content providers can earn money indirectly
from the users. The service is funded by monetizing information about the
internet user, about his preferences, his interests and his social circle,
basically the information collected in the form of digital footprint. If the user
pay a subscription or not, these information will be collected and used for
various purposes.
The users may notice that when they visiting a web page there are
so many advertisement all over the pages. Most of the advertisements are
matching with the users’ preferences. How the content provider predict the
correct advertisement is from the collected digital footprint information. For
example a user searching for a shirt in an online store and he is interested on
it. This data will be stored, next time the user log in to a web page he will
notice the shirt advertisements are popping up at the page.
To select the right advertisement on the page, the marketers and
the advertisers may choose based on the demography, language, right product,
the correct time and other factors; that will help to target the consumers
effectively.
Some intermediate parties playing a role between the user and the
advertisement companies. The intermediate parties collect user information such
as user profile, preferences, language and single sign-on data, and they
analyze and process the information and provide to advertisement companies.
There may be no direct connection between the user and the advertisement
parties, the connection resides through intermediate parties.
Monday, March 7, 2016
Add list of users to SharePoint group using powershell
After migrating
SharePoint 2010 site to SharePoint 2013 the user permission is not working as
in 2010. The users are getting access denied message. This is due to SharePoint
2013 use the claim based authentication mechanism. As a quick fix I wrote a
power shell script to add users to a SharePoint group.
Store the users in a
text file as bellow format:
i:0#.w|domain\username
Use the bellow
script to add permission:
 $loc = Get-Location;
 $Users = Get-Content "$loc\Users\Users.txt";
 foreach ($User in $Users) {
 write-host($User);
 Set-SPUser -Identity $User -Web "http://shpapp:2000/sites/TaskApproval/" -Group " Task Confirmation Users";
 }
Friday, March 4, 2016
Site collection feature not visible when upgrade solution from SP 2010 to SP 2013
I migrated a
SharePoint 2010 site to SharePoint 2013 farm. And crated a custom web part and
deployed to the 2013 environment as usual PowerShell commands.
The commands as
follows:
- Add-SPSolution -LiteralPath c:\TaskApp.wsp
- Install-SPSolution -Identity TaskApp.wsp -WebApplication http://shpapp-02/sites/TaskSite -GACDeployment
After deploying the
wsp to a web application the feature was not visible in the site collection
features page.
The issue is due to
the migrated site is comes with the 2010 user experience. Once the wsp is
deployed using the above command the feature goes to 15 hive which cannot be
display in a 2010 user experience site.
Resolution
I have tried below 2
options both worked:
- Change the user experience to SP 2013 UI by following 'Start now' link at the top of the site.

After
changing the user experience you can see the feature in the site collection
features page.
If
the user does not like to change the UI layout this option is not going to work
out.
2. You can follow bellow
commands to deploy the wsp:
- Install-SPSolution -Identity TaskApp.wsp -WebApplication http://shpapp-02/sites/TaskSite -CompatibilityLevel 14 -GACDeployment
This
command is adding the feature to the 14 hive features directory, this will be
displaying in the site collection features page.
Thursday, February 18, 2016
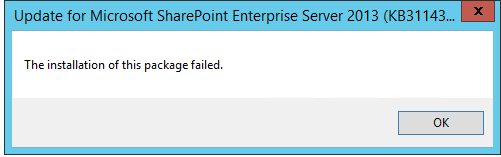
The installation of this package failed.
When I try to install CU update
for the SharePoint 2013 server, it gave bellow error:
Resolution:
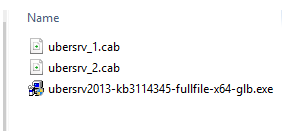
This is due to missing of some
cab files. For the complete installation the bellow files should be there:
Wednesday, February 17, 2016
Change url of document library - SharePoint 2013
After creating the
document library in SharePoint 2013, sometimes you might need to change the url
of the library. You can follow bellow steps in the browser:
- Open the document library
- Go to library settings from Library tab at the ribbon
- Click 'List, name, description and navigation' link.
Using above steps
you can change only the library name, but the url will not change.
Using the browser
there is no way to change the url. You can do this using SharePoint Designer.
Follow the bellow steps:
- Open the SP designer and click on the 'All Files' not the 'List and Libraries'
- Right click on the library and select 'Rename'
This will change the
library name as well as the url.
Tuesday, January 6, 2015
Consume JSON web service by posting JSON to the server as input
Following code describes how we can consume a JSON web service
by passing inputs as in JSON formats.
public static void GetJson()
{
var httpWebRequest = (HttpWebRequest)WebRequest.Create("<>" );
httpWebRequest.ContentType = "application/json";
httpWebRequest.Method = "POST";
httpWebRequest.Accept = "application/json";
IWebProxy proxy = httpWebRequest.Proxy;
if (proxy != null)
{
string proxyuri = proxy.GetProxy(httpWebRequest.RequestUri).ToString();
httpWebRequest.UseDefaultCredentials = true;
httpWebRequest.Proxy = new WebProxy(proxyuri, false);
httpWebRequest.Proxy.Credentials = System.Net.CredentialCache.DefaultCredentials;
}
using (var streamWriter = new StreamWriter(httpWebRequest.GetRequestStream()))
{
//Sample JSON input
string json = "{\"filter\":\"CREATED_DATE\",\"customerList\":
[5478, 25414],\"fromDate\":\"2014-08-13\",\"toDate\":\"2014-09-11\",\"status\":\"transit\"}";
streamWriter.Write(json);
streamWriter.Flush();
streamWriter.Close();
var httpResponse = (HttpWebResponse)httpWebRequest.GetResponse();
using (var streamReader = new StreamReader(httpResponse.GetResponseStream()))
{
var result =
streamReader.ReadToEnd();
Console.WriteLine(result);
}
}
Console.ReadLine();
}
The Sample JSON input added at the above code is passed to
the server and the result is queried based in the provided input.
Tuesday, June 3, 2014
Authenticating Users via Facebook in ASP.NET MVC 4
This section shows you how to build an ASP.NET MVC 4
application that enable users to log in with external providers like Facebook. The
same way you can authenticate users using Google, Twitter, etc…
The following describes the steps to follow.
In Visual Studio, create a new ASP.NET MVC 4 web application
and name it as ‘FB’. Select the target framework as 4.5 or 4.
Select ‘Internet Application’ as the project template.
In the selected project template, the project is created
with a file named AuthConfig.cs in the App_Start folder. This file contains
code to register for external authentication providers. By default, the code
segment is commented.

Since we are going to authenticate users using Facebook,
uncomment the section that represent Facebook authentication.
public static class AuthConfig
{
public static void RegisterAuth()
{
// To
let users of this site log in using their accounts from other sites such as
Microsoft, Facebook, and Twitter,
// you
must update this site. For more information visit
http://go.microsoft.com/fwlink/?LinkID=252166
//OAuthWebSecurity.RegisterMicrosoftClient(
// clientId: "",
// clientSecret: "");
//OAuthWebSecurity.RegisterTwitterClient(
// consumerKey: "",
// consumerSecret: "");
OAuthWebSecurity.RegisterFacebookClient(
appId: "",
appSecret: "");
//OAuthWebSecurity.RegisterGoogleClient();
}
}
The above code required for two parameters; appId and
appSecret. If you try to run the application now, the application will throw
exception. You need to give valid parameters, to provide the values, you must
register your web site with Facebook.
Registering the web
site with Facebook
You must register with the provider to get the required
parameters. Visit Faceebook
Developer page and click ‘Create a New App’ link under Apps to create a
test app.

Give Display Name, Namespace and click ‘Create App’ button.
Go to settings tab of the created App, you will find the App
ID and the App Secret.

While registering you need to provide MVC application
hosting URL to Facebook App (in my case localhost). You can give the URL by
clicking ‘Add Platform’ link.
As the final step add the appId and appSecret to AuthConfig class
and you have done. Run your application and click in Log in button.
The template automatically includes the button to log with
Facebook.

You can click on the Facebook button, which will redirect to
Facebook login page.

Once you log in using Facebook credentials, you can see the
home page of the MVC application with the Facebook user.

Monday, May 12, 2014
Optimized paging in Infragistics WebDataGrid
In Infragistics WebDataGrid the Paging and sorting are easy. You can
find the sample code at the following location: http://www.infragistics.com/products/aspnet/sample/data-grid/custom-databinding-paging-collection. If we want to work with
large data sets, thousand or million of records, querying all the data
for every page click is not effective. Then we need to go for a optimized
approach. This article describes how to go for a scalable application. This is
applicable for ASP GridView as well.

I
am using Northwind Customers database table for query the data. As the first
step we need to create a stored procedure in SQL. The stored procedure should
contain some techniques to work with page size and start index. Following is
the stored procedure used:
Create PROCEDURE spGetAllCustomersForGrid
(
@startIndex int,
@pageSize int,
@sortBy
nvarchar(30)
)
AS
SET NOCOUNT ON
DECLARE
@sqlStatement nvarchar(max),
@upperBound int
IF
@startIndex < 1 SET @startIndex = 1
IF @pageSize < 1 SET @pageSize = 1
SET
@upperBound = @startIndex + @pageSize
SET
@sqlStatement = '
SELECT C.CustomerID,
C.CompanyName,
C.ContactName,
C.ContactTitle,
C.Address,
C.City,
C.Region,
C.PostalCode,
C.Country,
C.Phone,
C.Fax
FROM (
SELECT ROW_NUMBER() OVER(ORDER BY '
+ @sortBy + ') AS rowNumber, *
FROM Customers
)
AS C
WHERE rowNumber >= '
+ CONVERT(varchar(9), @startIndex) + ' AND
rowNumber < '
+ CONVERT(varchar(9), @upperBound)
exec (@sqlStatement)
This
stored procedure uses start index, page size and sorting expression as input
parameters. Start index is the starting item of the selected page. Page size is
the no.of records to displayed in the grid. Sorting expression sort the data
set async.
We
have another stored procedure to get the total no.of records. The following is
sp will return the total no.of records:
CREATE PROCEDURE TotalCustomers
AS
BEGIN
SET NOCOUNT ON
SELECT COUNT(*) FROM Customers
END
Now
open Visual Studio and create a new ASP.NET application. Add a WebDataGrid to
the aspx page. Following is the aspx page source:
<div>
<asp:ScriptManager runat="server"></asp:ScriptManager>
<ig:WebDataGrid ID="WebDataGrid1" runat="server" DataKeyFields="CustomerID" Width="100%"
Height="467px" DefaultColumnWidth="90px" OnCustomDataBinding="WebDataGrid1_CustomDataBinding">
<Behaviors>
<ig:Paging PageSize="5" />
</Behaviors>
</ig:WebDataGrid>
</div>
We
are creating a entity class to map the customer object with all the properties.
public class CustomerEntity
{
public string CustomerID { get; set; }
public string CompanyName { get; set; }
public string ContactName { get; set; }
public string ContactTitle { get; set; }
public string Address { get; set; }
public string City { get; set; }
public string Region { get; set; }
public string PostalCode { get; set; }
public string Country { get; set; }
public string Phone { get; set; }
public string Fax { get; set; }
}
Open
the code behind of the aspx page and create a method to query the records from
database. Use the following method to query the database:
public List<CustomerEntity> GetCustomersInRange(int startIndex, int count)
{
CustomerEntity customer;
List<CustomerEntity> customerList = new List<CustomerEntity>();
using (SqlConnection conn = new SqlConnection("your connection
string"))
{
SqlDataReader rdr = null;
SqlCommand cmdSelect = new SqlCommand();
conn.Open();
cmdSelect.CommandText = "spGetAllCustomersForGrid";
cmdSelect.CommandType = CommandType.StoredProcedure;
cmdSelect.Connection = conn;
int rangeCount = count;
int repositoryCount = DataCount();
if (startIndex + count > repositoryCount)
rangeCount =
repositoryCount - startIndex;
cmdSelect.Parameters.AddWithValue("@startIndex", startIndex);
cmdSelect.Parameters.AddWithValue("@PageSize", rangeCount);
cmdSelect.Parameters.AddWithValue("@sortBy", "CustomerId");
rdr =
cmdSelect.ExecuteReader();
while (rdr.Read())
{
customer = new CustomerEntity();
customer.CustomerID = rdr["CustomerID"].ToString();
customer.CompanyName = rdr["CompanyName"].ToString();
customer.ContactName = rdr["ContactName"].ToString();
customer.ContactTitle =
rdr["ContactTitle"].ToString();
customer.Address = rdr["Address"].ToString();
customer.City = rdr["City"].ToString();
customer.Region = rdr["Region"].ToString();
customer.PostalCode = rdr["PostalCode"].ToString();
customer.Country = rdr["Country"].ToString();
customer.Phone = rdr["Phone"].ToString();
customer.Fax = rdr["Fax"].ToString();
customerList.Add(customer);
}
return customerList;
}
Then
create a method to get the total count of records.
public int DataCount()
{
//Add
code to access TotalCustomer SP
}
Now
you are about to complete the last few steps. Define the data source at the
page load event and at the custom data binding event call for our method
developed for query.
protected void Page_Load(object sender, EventArgs e)
{
WebDataGrid1.DataSource = new List<CustomerEntity>();
}
protected void WebDataGrid1_CustomDataBinding(object sender, DataBindingEventArgs e)
{
WebDataGrid grid = sender as WebDataGrid;
grid.ScrollTop = 0;
int currentPage = grid.Behaviors.Paging.PageIndex;
int pageSize = grid.Behaviors.Paging.PageSize;
int startIndex = currentPage * pageSize;
e.Cancel = true;
e.DataSource =
GetCustomersInRange(startIndex, pageSize);
e.SelectArguments.TotalRowCount =
DataCount();
}
Run
the application and browse your aspx page, you will get the result.
You
may test how the query works. You can use SQL Server Profiler to check the
query execution. Since the page size is 5, the db returns only 5 records at a
page click. It will not return all the records as the normal procedure.
Subscribe to:
Posts (Atom)